
The Trick to Perfectly Fitting Press-On Nails
Share
The Perfect Fit: How to Properly Size Your Nails for Press-On Nails
Press-on nails are a quick and stylish way to elevate your look, but getting the perfect fit is crucial for a natural appearance and long-lasting wear. Improper sizing can lead to lifting, discomfort, or an uneven finish. This guide will show you how to measure your nails at home accurately—no special kits required—using just a few basic tools and some simple steps.
Why Proper Sizing Is Important
Sizing your nails correctly ensures:
- A Seamless Look: Nails fit edge-to-edge for a natural, polished appearance.
- Better Durability: Well-fitted press-ons stay secure and are less likely to pop off.
- Comfort: A proper fit feels like a natural extension of your nails.
What You’ll Need
Before you start, gather the following items:
- A flexible measuring tape or ruler (with centimeter markings).
- A pen or pencil to record measurements.
- A notepad or your phone to keep track of each nail size.
Step-by-Step Guide to Sizing Your Nails
1. Prepare Your Nails
Begin with clean, dry nails. Remove any polish, oils, or debris. A quick wipe with an alcohol pad ensures your nails are residue-free and ready for measuring.
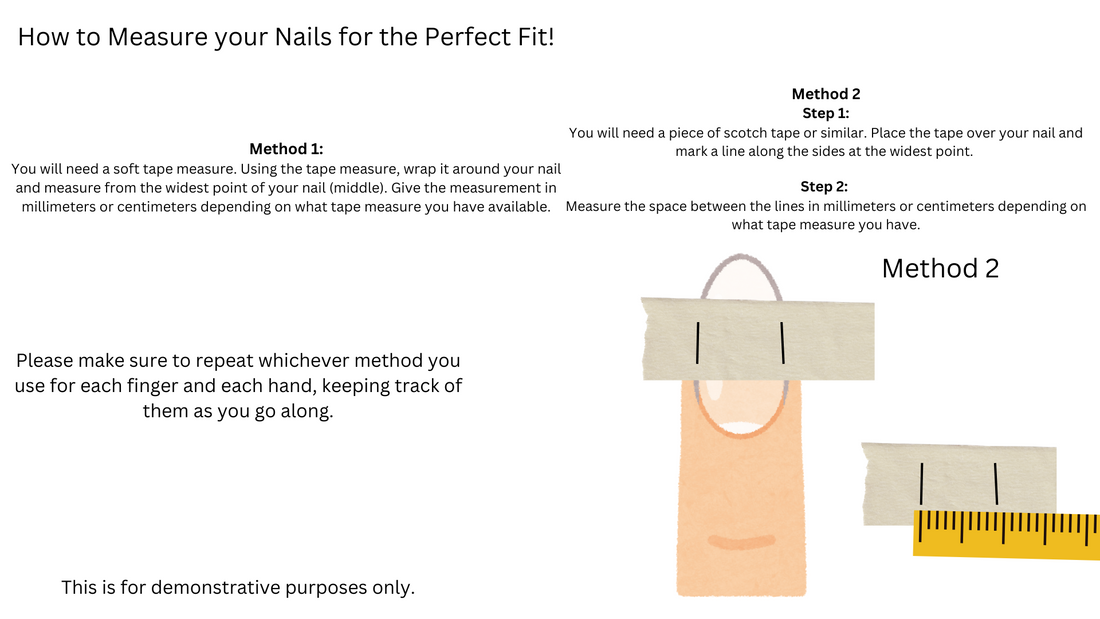
2. Measure Each Nail
Using a flexible measuring tape or ruler:
- Place the measuring tool across the widest part of your natural nail (usually the middle).
- Note the width in centimeters (e.g., 1.1 cm, 1.2 cm, etc.).
- Repeat for all 10 fingers, as nails can vary slightly between each finger and hand.
Tips for Accurate Measurements
- Measure Twice: Double-check your measurements to ensure accuracy.
- Consider Slight Differences: Don’t assume your left and right hands are identical—many people have slight variations between hands.
- Write It Down: Keep a record of your measurements for future reference to make ordering press-ons easier.
What If the Fit Isn’t Perfect?
Press-ons are designed to be slightly adjustable, so even if the fit isn’t exact, you can tweak the nails by filing the edges or reshaping them to better match your nail beds. Starting with larger nails and shaping them down often gives the best results.
Final Steps: Applying Your Press-On Nails
Once you’ve sized your nails, it’s time to apply them for a flawless manicure:
- Prep Your Nails: Buff the surface gently to remove shine, and wipe with alcohol to create a clean base.
- Apply Adhesive: Use nail glue for a long-lasting hold or adhesive tabs for temporary wear. When using glue, apply the glue to most of the nail bed and a little at the base of the press-on. This allows for the two to bond better and can add up to an extra week of wear.
- Press and Hold: Align the press-on nail at the base of your cuticle and press down firmly for 10–15 seconds.
Conclusion
Properly sizing your nails for press-ons is the secret to a natural, comfortable, and secure fit. By measuring your nails accurately with a flexible measuring tape or ruler, you can ensure your press-on manicure looks and feels its best.
Say goodbye to ill-fitting nails and hello to a flawless, salon-quality manicure from the comfort of your home. Ready to get started? Explore our stunning press-on designs and make every nail fit perfectly!
Amieznails.store